Are you looking to become a skilled pitcher that can always find a way to cause problems for the opponent’s hitter? In that case, you cannot only rely on a fastball, but you also need to know how to throw a curveball.
A curveball is when you pitch in a way that the ball to curve as it approaches the batter and breaks below its bat. If you ask me, this can be the secret weapon of any pitcher as long as they master it properly. This is what we will focus on in this article as I did extensive research (and tried everything myself!) on all details related to throwing a curveball. You will read what tools are needed for practicing and there is an in-depth guide to take you throughout every step of the process.
Whether you are only playing with your friends or competing professionally, I firmly believe this article is what will help you become the best pitcher in your team!
What You Will Need to Follow This Tutorial
Here is a quick look at the things you may need for mastering a curveball:
Baseball – this is the only piece of equipment you will essentially need to practice throwing a curveball. Make sure that you choose a real baseball of appropriate size and shape and not some cheap fake product. You want the ball to be in an excellent shape, which means it shouldn’t be torn or damaged in any way. This is particularly important if you are taking part in the official competition – you need to have the same ball during training as in games.
Outdoor space – you are practicing to throw a ball, which means you will need a certain amount of open space. It is a smart idea to head outdoors even if it is your own backyard. The only thing to consider is that there aren’t statues or other things you may potentially break. The best option is to head to a local baseball playground if there is one. Alternatively, you may also visit a nearby park, but make sure there aren’t any people bypassing when you are throwing the ball.
Pitcher gloves – while these may not be vital for practicing, you should consider using them during games. The biggest advantage they provide is the closed design that allows you to hide your hand and prevent the batter from predicting you are about to throw them a curveball.
An assistant – while they are not crucial to your skill, they can make training easier. A partner can throw balls back to you and speed up the process. They can also make things more fun as it is not always pleasant to train alone. And if your assistant is a batter, you may even have a joint training session and perfect both skills at the same time.
Step by Step Instructions
Before we head to learning how to throw a curveball, let’s take a look why you should learn it in the first place. For starters, everyone agrees that it can be an extra weapon in your arsenal, which is of critical importance for every pitcher. Here are some additional advantages that curveball provides:
Plenty of room to experiment – even if you are not trying to learn to throw a curveball, the chances are you will get the desire to experiment with various grips. As soon as you identify the desire to move away from the fastball, you should properly learn how to curve the ball. It is up to you and your coach to determine how often to use it afterward.
Decrease the elbow stress – a fastball puts a lot of stress on your elbow and injuries are possible. Burdening your elbow constantly may lead to problems and, in rare occasions, you may even suffer from a UCL tear, which requires a long recovery. The trick with throwing a curveball is that it doesn’t require the same amount of force. This automatically decreases the elbow stress, which may prolong your career in the long run.
Deceive the batter – once you become experienced, you will be able to throw curveballs that look exactly like a fastball but end up in changing their direction just before the batter plans on hitting them. Moving back and forth between fast and curveballs is the best way to help your team and boost your performance.
Now, let’s move to a step by step guide on throwing a curveball.
Step 1: Find the Right Grip

It is not difficult to hold a good grip when throwing a curveball. In fact, this throw allows you additional ball control. You should aim to place topspin on the ball as this causes wind resistance and eventually leads the ball to drop before it reaches the batter. Finding a proper grip is essential to throw a curveball that will be undefendable.
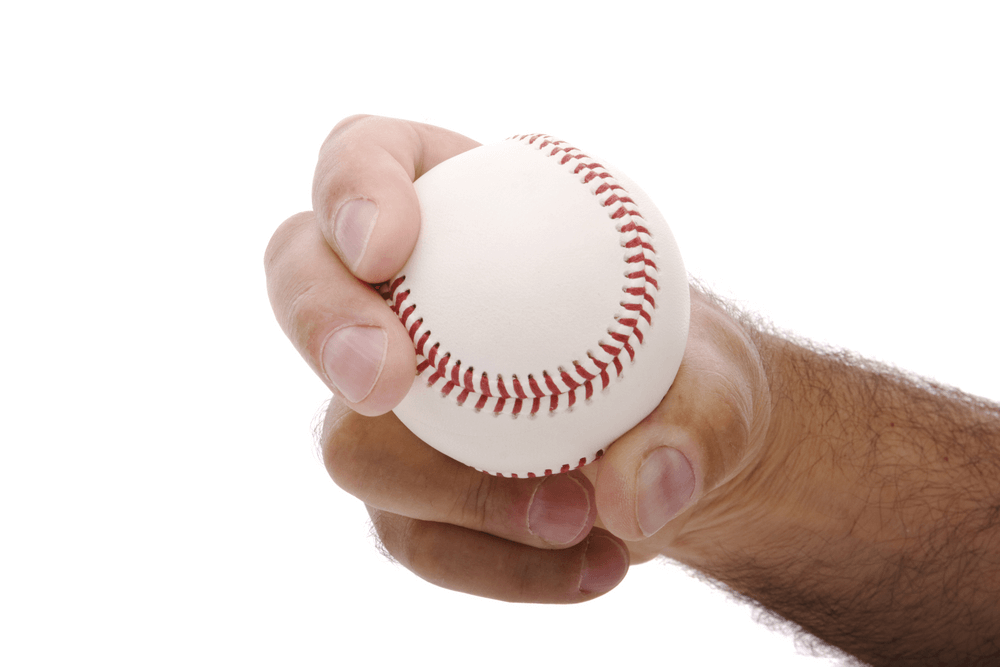
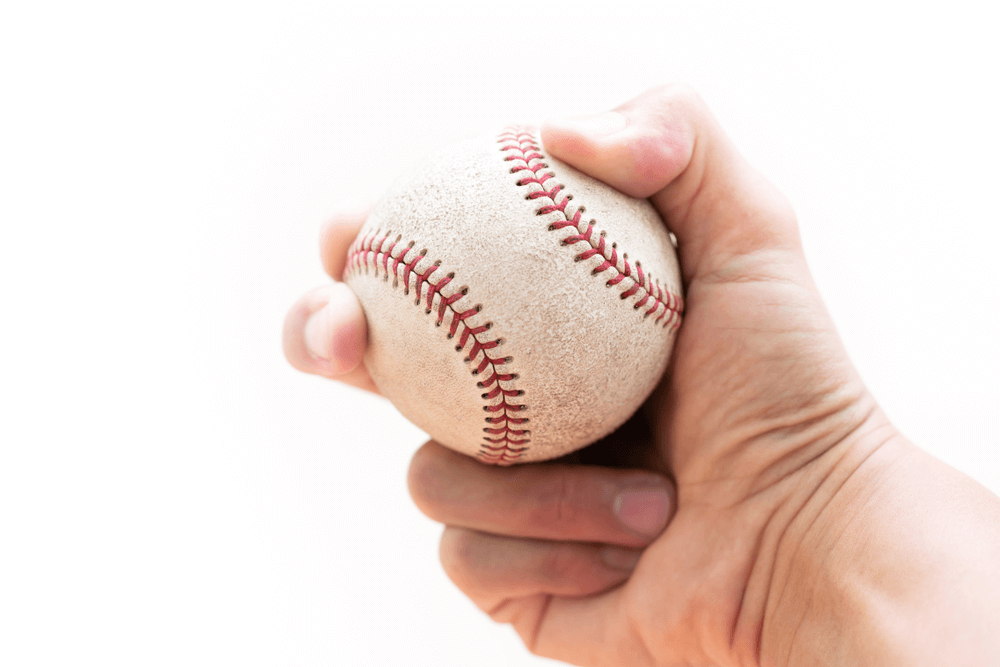
Begin by using your index and middle fingers to get a grip of the ball. You want to place the fingers across the ball’s seams. Aim for the biggest distance among the seams. If it looks complicated, just take a look at the photo.
Avoid the ball touching your palm and make sure that your grip is tight. Not doing this will result in failing to generate forward spin and lead to an unsuccessful curveball.
Pro Tip: Practice in front of the mirror to ensure that you managed to grip the ball properly.
Step 2: The Importance of Secrecy

You can use your other hand, but this is why a pitcher’s glove is extremely useful. If you have certain experience with pitching, you know that hiding your move from the hitter might be the crucial factor in winning the battle. As you can see in the photo, professional players apply this technique.
Hiding the ball and your grip allows you to surprise the hitter with your curveball. You can also apply additional tricks, such as using different stances every time.
Step 3: Throwing the Ball

This is where a curveball is similar to fastballs. You can experiment with various speeds and distances, but the general speed should be about the same as when throwing a fastball. It is the spin that allows it to slow down when needed and not the velocity.
However, you should aim to find an adequate angle for your hand. Imagine you are using an axe and want to chop down a tree. The palm should be turned toward the first base if you are right-handed or third base if left-handed. Due to the secrecy, you have to keep, make sure you swiftly handle the throw and the release.
Step 4: The Release

Start by holding the same angle of your arm to protect your intentions from the batter. Cock your wrist and rotate it to face your body. The palm and the ball should both be turned toward you. While holding the elbow up, turn and snap the wrist down to perform the release.
It will take a lot of practice to properly do the snap motion and find the ideal release point. Once you release, the back side of your hand must be turned toward the hitter. Allow the arm you used to throw to swing across as it puts you in the right fielding position.
Pro Tip: Do not forget that it takes a lot of practice to master throwing a curveball. It is essential to stay persistent and regularly perform this throw during training as it is the best way to prepare for games.Conclusion
That marks the end of our tutorial on throwing a curveball. Did you guys enjoy it as much as I did while writing it? I believe this is an essential move for every pitcher that wants to make things extra tough for the rivals. If you would like to comment and share extra tips on the topic, please feel free to express opinions in the comment section below. Do not forget to share the article if you found it useful!

